Precision tools were always requested in Blender, but fortunately we have a large number of Python Scripts that add new tools and functionalities for modeling with precision. There is a Script called Lengthen, which can change the distance between two vertexes of a model. This change is controlled by the user, and then we have absolute precision.
The author of the Script is called Pedro Caiero and the version I�m using in this article was updated by Levi Schooley. I will be using in this tutorial the Length 0.15 (The image shows 0.14, I guess the author forgot to change the text…), you can copy the Script here:
http://members.isp.com/gschooley@isp.com/lengthen_add_015.py
You have to copy the file �lengthen_add_015.py� to your Blender Scripts folder. In my case, I have place the file on �d:/Blender/.blender/scripts�. To run the Script you must create use the Blender Scripts Window, like the one in Image 01.
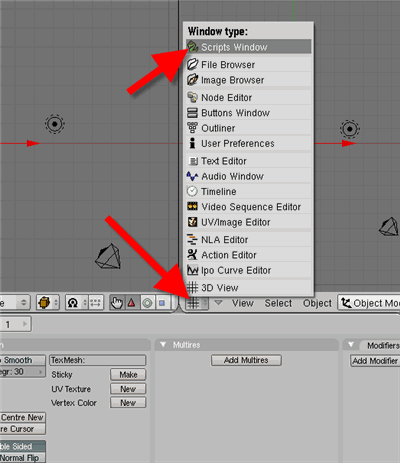
Image 01
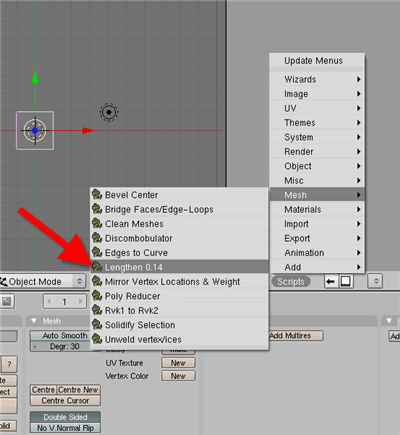
Image 02
When the Script Window is opened, select Lengthen in the Mesh script type. The interface of the Script is very simple, as showed in Image 03.
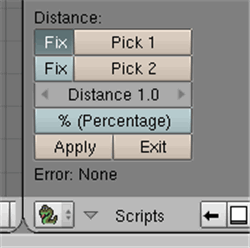
Image 03
To use Lengthen we must select two vertexes and then choose the new distance between those selected vertexes. The orientation of these vertexes does not change, only their distance.
Let�s see the options available in the Script, and then work on an exercise.
- Fix: With this button we can determine if the first or the second vertex will be moved. Only one can be moved. If the button is pressed for the first vertex, then the second vertex will be moved.
- Pick1: If you have one vertex selected and press this button, this vertex is selected as the vertex 1.
- Pick2: If you have one vertex selected and press this button, this vertex is selected as the vertex 2.
- Distance: Here we can choose the new distance between the first and second vertex.
- % Percentage: If this button is pressed, any value entered in the Distance will be handled as a percentage. If we have two vertexes and a distance of 3.00 between them and choose a new distance of 0.50, with the �% Percentage� turned on, the new distance will be 50% of 3.00. The vertex will have a distance of 1.50 between them.
- Apply: Press this button to run the Script and move the vertex.
- Exit: Press this button to quit Lengthen.
Now that we know how every option works, let�s use the Script. I�ll use a simple box, just to show how it works. The first step is open a Scripts Window and select Lengthen, just as showed in the begining of this article.
After that, select the object and enter Edit Mode. You must select the vertex pointed in Image 04, then press Pick 1. A message will apear in the Scripts Window to confirm the selection.
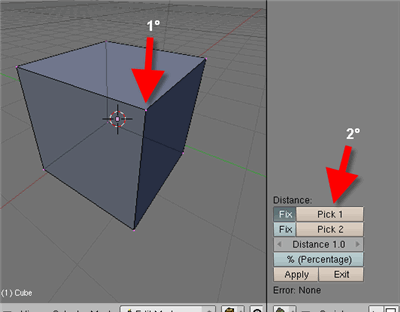
Image 04
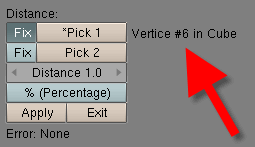
Image 05
Now we must do the same process for the second vertex. Select the vertex pointed in Image 06. When you select the second vertex, the Script will show the distance between the two vertexes.
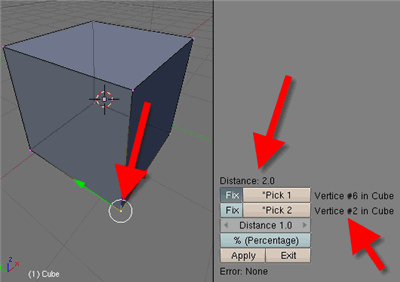
Image 06
I want to translate the first vertex and the second vertex won't move. For this you must press the Fix button for the second vertex. The final distance between those vertexes must be 0.4 units, so the value of the Distance must be set to 0.4.
Now all we have to do is press Apply, and the distance between them will be set to 0.4 units (Image 07).
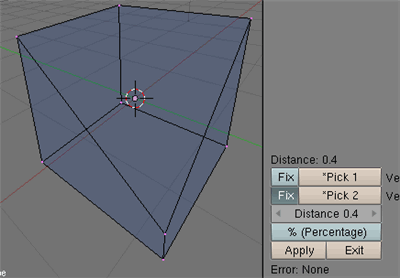
Image 07
That's it! Now everytime you need absolute precision, just use this small, but useful Script. Of course this Script could be improved, but it's a good start!
Sorry for any mistakes in my english, and see ya in the next tutorial! 🙂